The long weekend is over and I hope everyone had a great American Thanksgiving. I cooked a mean crown roast for Canadian Thanksgiving in October and for this past weekend, my husband barbequed a duck – it was delicious! It was so nice that we could finally relax and enjoy the house.
Without further delay, this is a more detailed explanation of what was done to the courtyard. I hope I didn’t miss anything but don’t hesitate to ask me.
These are a few ‘early days’ photos of the courtyard:
I took this photo when we first looked at the house. Yes, that is a huge crapload of crap in the courtyard.
Once again, closing off the outside with that Omen style wrought iron fence
Here it is after we cleaned it out and removed the fence. You can see the original siding and solarium. The red brick planters on either side were falling apart and leaking. So Shawn smashed them to bits. I think he rather enjoyed that!
And here is a new shot from the same angle. Goodbye concrete jungle!
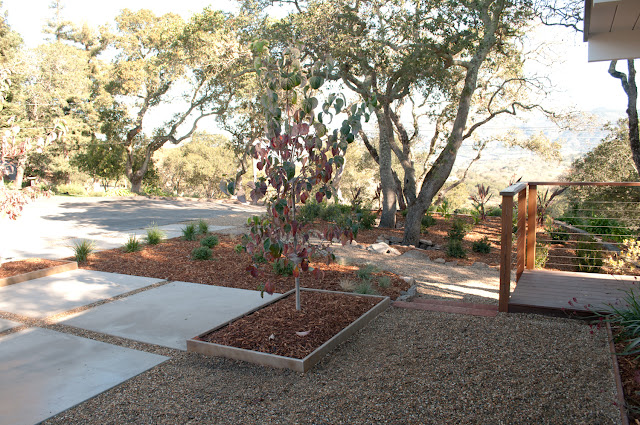
The entire courtyard concrete was taken out as well as half of the asphalt driveway and concrete pads were poured. Plant areas were added as well as Cor-ten steel planter boxes were custom made by
On Spot Welding . More detailed photos below. Lodi gravel was added to the spots around the concrete pads. Those are dogwoods in each planter box in the front (Shawn’s parents had them in front of their house and he always liked them). We still need to get the remaining asphalt driveway resealed so excuse the cracks and chunks missing!
To give you a better idea of how much asphalt was taken out, this photo was taken over the summer:
And now:
We had various grasses planted as well as azaleas and camillias, kangaroo paw and canna lilies.
 |
| One of our newly planted canna lilie |
Solarium
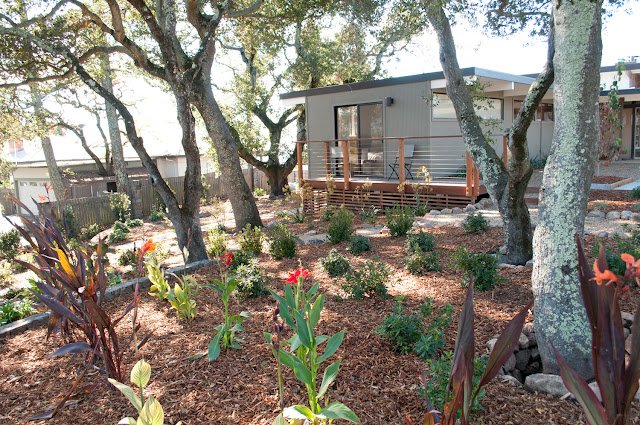
This was the butt ugly solarium, which was located at the back of the courtyard, off of the living room area: I found out that this solarium was added in the 80’s. Another structure added to cut off the outside.
As part of the dismantling of the solarium, we got rid of the door which led to the hallway.
You can also see in this picture the weird small window that was right by the front door and looked into the kitchen pantry. Such a strange place for a window. We got rid of it.
Same angle, now:
Ahh, that looks better! And really gives the living room a 2 sided view. A Cor-ten steel planter box was added by the front door, and filled with Blue Oat Grass and Aspidistra elatior or Cast-Iron plant. Both do very well in shade as that area does not get much sun.
The 3 wood support beams were replaced with korten steel beams. A close-up of the beam:
This Cor-ten steel is super cool. Through a chemical process, when it is exposed to water, it oxidizes and gives it that rust look. It’s interesting watching them transform.
Rain Chains
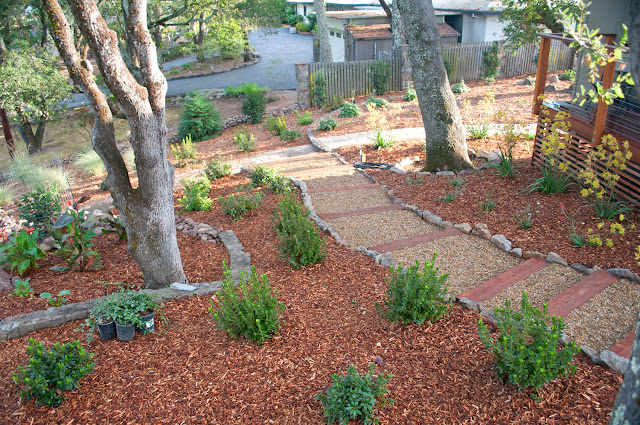
A shot of the concrete pads leading up to the front door:
That’s horsetail in the large Cor-ten steel planter box. It grows like a weed. Every once in a while I give it a haircut to make the top level. It’s kind of fun! The downspouts were replaced with rain chains, also made by On Spot Welding. The water trickles down the chain and into the drain, which eventually drains out on the downward slope of our driveway. It’s pretty darn soothing to watch in a rainstorm. Much more soothing than watching our garage flood.
(And before you ask, yes the water splatters around in a big storm or wind. But the courtyard drains amazingly well.) This was another idea I gleaned from
Houzz.com (cmon, click on it, you know you want to!) Rain chains originated in Asia and have become increasingly popular, especially here in wine country and in modern landscapes.
Another shot of the area that used to be asphalt.
And the new steps leading to the side of the house:
Firepit
We had always planned to have a custom gas firepit installed, we just weren’t sure when. Until then we were enjoying my Walmart jobbie.
Well, we bit the bullet. We ordered a predone 60″ x 60″ pit from
The Fireplace Element as well as an assembled gas burner. You may recall, in the demolition and rebuilding of the courtyard, a trench was dug and pipe added to hook up to the natural gas.
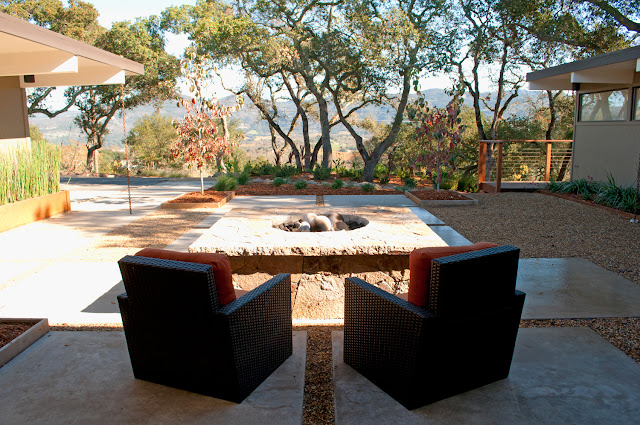
This is the predone concrete slab firepit, right when the stonework was beginning to get added:
And here is a close-up of the finished product:
The custom stonework was done by our landscaping company, Carlos Landscaping here in Napa – Enrique is the stonemason. The rock is syar stone with no mortar in between – it’s more meticulous to cut but it gives it a much cleaner look than mortar in between the joints.
This was taken over the summer with our portable firepit and concrete view:
And here is the new view:
 |
| Holy mother of a firepit! |
Much less concrete-y, isn’t it? But damn, we seriously need more outdoor furniture now!
And here is me enjoying the fire- ahhhhh! All the work, upheavals, bullshit, crap, and mess were finally worth it!
I better hurry and enjoy, though. A big storm is moving in tonight.


Love seeing all the pictures, Michelle. I can’t understand why you didn’t like how it use to look? All those pots and closed in clutter? HA HA HA! Seriously, what a huge difference. My husband would have LOVED tearing down that fence and pulling everything out. He’s Mr. Destructo… but doesn’t like putting it all back together. You guys put it back together so beautifully!
Gorgeous plants. I see a little agapanthus too! I have some of those and I love the blue/purple flowers. At first I thought the trees were red buds but dogwoods are even better. I love how sweet they look all in bloom.
The landscape is all so beautiful and you’ve chosen really well. I’ve never had luck with the Kangaroo Paw in Texas. I’ve tried twice and they die each year. (sigh)
I’m totally taken with rain chains. We tried to figure out how or where we could put one on our house but it just doesn’t drain in places where it would work. Several years ago we stayed at the San Jose hotel in Austin and they had rain chains everywhere. We were so taken with them. I even took pictures. >>> http://www.agoodehouse.com/wp-content/uploads/2012/11/rainchain.jpg
It’s so great that you used them!!!
Love the boots! Kickin’ back in style suits you! Congrats on it all. BEAUTIFUL.
Thanks, Stacey!
Yes, I’m so glad I took a lot of pictures, we look back on them now and realize how much work we did! I hate clutter…except in my sewing room and uh, I’m working on that…
We didn’t put it back together ourselves, we just directed lol. Yes, the agapanthus came with the house so I neglected to mention them. We have some in the front and side of the house. I like them too, and how easily they grow!
All of our kangaroo paw is doing well – except for the courtyard ones that are looking a little sad. I really feel they don’t get enough sun there.
Being a partial flat roof, we have a LOT of drains – and they were originally ugly drain pipes – enter the rain chains.
I love boots! I’m trying to be wine country chic 🙂
Can I get your color palette for the outside house colors. I liked your choices, good job!
Hi Steve,
Thanks for visiting! the base color is Benjamin Moore ‘Cromwell Grey’ and the fascia is Kelly Moore ‘Oxford Brown’
Good detail. I really like how this came out. Gives me great ideas because we need to redo our interior courtyard. I like the crazy rain chains. We already installed gutters. Ugly as they are. Our roof was getting trashed without them. The STUPID solarium had to go. What were they thinking? And the dopey wrought iron. I am having trouble with kangaroo paw in places without full sun. Oh, our entire yard because we live in beach haze. The firepit came out great. Husband wanted one in the big vast front yard. When he sees this, he will be annoyed that I put a tree well in the middle. Darn it. Thanks again for the detailed pictures. Love this.
The main important by using the Masonary Mortar is that it support the wall i.e. if there are some damages then it immediately overcome this situation so that it should be significanty appropriate in building construction field..
Where did you find the black tube like lights for under your soffits? I love them!
Hi Emily,
We actually got them from Home Depot! They are great quality and not too pricey. http://www.homedepot.com/p/Progress-Lighting-Black-Outdoor-Flushmount-P5741-31/100467681
Hi Michelle,
Just searching for nice color combinations for an Eichler exterior and found yours through some searching. I see that you’ve told someone about the two exterior colors already and have taken note, but could you tell me what color you used for the door? The combination is lovely. We have an Eichler in the Bay Area. Also, love the planters with the horsetail along the wall. Wonderful job and great property!
Hi Nancy,
Thanks for visiting! The color we originally painted the door was Benjamin Moore Merlot Red. But we recently put in the inserts and painted it a brighter color (which I personally like better) which is Benjamin Moore Redstone. Hope this helps! Love to hear about your Eichler and where it is.
Hi Michelle
This project looks great!
Question: 6 years on, how is the Equisetum (Horsetail Reed) doing in the planters?
What medium did you use? Have you had to add any nutrients to the bed?
Your experience would be greatly appreciated!
Hi there,
Thanks, it’s still going strong. No nutrients required just have to remember to keep it hydrated as they can dry out. The soil needs to be topped up or they tend to fall over.
Wow! Wow! And more wow!
Well done! Your house has amazing bones and the mature trees are fantastic, but what a HUGE difference your landscaping plan has made. You’ve got yourself a jewel. You’ll be using the outdoor seating and fire box for ages.